So...
Steeleye Span.
Marvelous British folk-rock group, to which my sibling Andy introduced me rather a few years back. A couple of months ago, I saw they were coming to the Ark, and decided that this was necessary. The concert was on Wednesday, and it was all that I could have hoped for. They played a lot of new stuff, and then their first encore song was my first Steeleye experience, "All Around My Hat". Sing-along-age was had. And then they played "Hard Times of Old England". And all was right. Also, David and I got a free copy of their "Bloody Men" CD!
This ties in with my recent joy: writing steampunk folk songs. I'm not sure where the idea came from, but I certainly haven't seen anyone else doing them. Anyway, these are the first songs I've ever written that sounded decent, and the excellent Jess and I recorded some today in the studio up on North Campus. The time constraint means I can't scrap 12 takes running -- good for my sanity, not so great for quality (the vocals are rather dodgy) -- but eh. Free studio space! :)
I have two done, and they are called "I'm Not Sorry" and "Firefly Waltz". One is about zeppelins and betrayal. The other is about betrayal and robots. I do want to do cleaner versions, and hope to add some mandolin soon; I just haven't got a mando part worked out yet. Plus, that requires either multiple sessions or bringing both guitar and mandolin up on the bus. Bleh.
So, yes... forays into musicality. Besides the hour spent fixing machinery, and the lack of water, most excellent. And I am going to branch out genre-wise. It is exciting.
Saturday, September 26, 2009
Monday, September 21, 2009
Magnetic fingers!
It sounds pretty awesome to have a sixth sense, for electromagnetism (à la this Wired article on rare-earth magnetic implants). But I'm not so keen on the surgery, stuff breaking down inside me, and possible infection aspects of the process. Plus, the "non-removable" part seems a tad impractical. And then, last night, David (my most marvelous S.O.) reminded me that he'd once brought me some broken neodymium ring magnets.
...Experiment time!
I happen to have a decent collection of different types of wire, for 2D twisted-wire drawings (I got into this when making things for a holography project) and jewelry-grade maille rings. During a couple of short house meetings, I came up with three of these:

Each is made from a single piece of brass wire and a magnet (I think the brass/nickel combo gives it a touch of steampunk aesthetic). They're probably not quite as sensitive as the implants, as they're not right against the skin, but they certainly work. The magnets are very strong, and I'll definitely keep playing with this concept. More pictures to come, including detail shots of all three, plus whatever else I come up with.
Thoughts and observations:
• It works best when the magnet is loose in its holder (though still secured against possible escape). This allows it to oscillate freely, which I can feel via the wires.
• Smaller pieces seem to work better, probably for the same reason - free oscillation within a cage-style attachment, while larger pieces suggest a wrapped fixture, as above. Due to these factors, plus the fact that many feedback wires attach magnet to finger, the first fingertip I made (left in the picture) is the most sensitive.
• I'm going to try making earrings, though these will probably be ear cuffs in the same wire-wrapped style, rather than with magnets sandwiching the ear. I do not wish to have my flesh squeezed. But I have a tendency to lose ear cuffs (part of why I make, rather than buy, them), so I'd have to make these extra-secure.
• I am a total sucker for jewelry that does stuff. These are a bit impractical for everyday wear, but the cuffs will definitely be making an appearance. :)
Tuesday, September 15, 2009
Helix chain!
Let me introduce you to my favorite chain weave. Why my favorite? Because it's the first one I've "made up", without referring to any guides. I was looking for a way to make an extra-strong chain, and came up with hooking each link through the previous two. Thus, I don't know if it is widely known, has a name, or if anybody actually uses it -- especially it has a property that might make it undesirable, but for me, adds to its charms. It is unstable; or rather, it morphs.
The first thing to do is get yourself a pair of pliers, preferably the type that has a compression spring to keep it open when you're not squeezing the handles. I've just been using a pair of multitools (a Leatherman and a random one I got from my sibling). Then you need rings, which you can either make (a topic for later!) or buy. I got these from The Ring Lord (0.4 lbs of Bright Aluminum rings for about $17)... I will definitely buy in bulk in future -- about $10.50 of that was shipping -- but I didn't know if I was going to be sticking with this hobby.
 The rings come like this, not open but not closed either. Our first order of business is to open lots of them, wide enough that you can pass another ring through the opening. Open them to the side, twisting, not pulling.
 Now we can begin. Close one ring all the way and hook an open one onto it, then close.
 Hold these two together so that they lie semi-flat against each other. Then hook another open ring through them both at once. Continue to hold the last few rings flat(-tishly) together while hooking new rings in; this will keep your spiral going in the same direction. Otherwise, it will not produce the helix.
 Yes my fingernails are dirty.
 Shut up.
 At the start, it may appear that you're doing everything wrong, because if you set the chain down it looks like this: messy and disordered. Don't worry; it always does.
 But once you get a decent few rings together, it starts to look like something you'd like to attach to yourself.
 I usually just fabricate a clasp from some scrap copper or brass wire, but this guy wanted it to just go over his head, so I attached the ends together such that it stays in "helix" configuration (twist and attach with a couple more rings) and added a little tail of chain to which he could attach his keys. I didn't really get a good picture, though, so this is what you get.

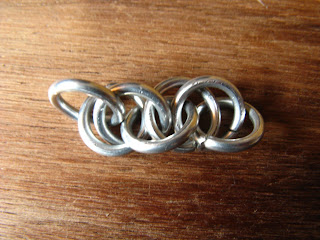
So, why do I like it so much? Well, you twist it one way, and it does this:
 And then you twist the other way, and it does this:
 . . . which I think also looks pretty cool. In this form, it looks like what it is: two chains interlocked. Each link is also pretty loose this way, so you can make it make noise. :)
These two pictures are actually of my first piece of helix, which is about double the length of a loose bracelet, which also happens to fit perfectly as a choker. So it can look four different ways, and makes a VERY good fidgety object. (Twist, untwist, double-twist, pluck so it rattles...)
I might put up images of what happens if you twist it further in either direction, but probably won't get around to it. Ah well.
The first thing to do is get yourself a pair of pliers, preferably the type that has a compression spring to keep it open when you're not squeezing the handles. I've just been using a pair of multitools (a Leatherman and a random one I got from my sibling). Then you need rings, which you can either make (a topic for later!) or buy. I got these from The Ring Lord (0.4 lbs of Bright Aluminum rings for about $17)... I will definitely buy in bulk in future -- about $10.50 of that was shipping -- but I didn't know if I was going to be sticking with this hobby.
 The rings come like this, not open but not closed either. Our first order of business is to open lots of them, wide enough that you can pass another ring through the opening. Open them to the side, twisting, not pulling.
 Now we can begin. Close one ring all the way and hook an open one onto it, then close.
 Hold these two together so that they lie semi-flat against each other. Then hook another open ring through them both at once. Continue to hold the last few rings flat(-tishly) together while hooking new rings in; this will keep your spiral going in the same direction. Otherwise, it will not produce the helix.
 Yes my fingernails are dirty.
 Shut up.
 At the start, it may appear that you're doing everything wrong, because if you set the chain down it looks like this: messy and disordered. Don't worry; it always does.
 But once you get a decent few rings together, it starts to look like something you'd like to attach to yourself.
 I usually just fabricate a clasp from some scrap copper or brass wire, but this guy wanted it to just go over his head, so I attached the ends together such that it stays in "helix" configuration (twist and attach with a couple more rings) and added a little tail of chain to which he could attach his keys. I didn't really get a good picture, though, so this is what you get.
So, why do I like it so much? Well, you twist it one way, and it does this:
 And then you twist the other way, and it does this:
 . . . which I think also looks pretty cool. In this form, it looks like what it is: two chains interlocked. Each link is also pretty loose this way, so you can make it make noise. :)
These two pictures are actually of my first piece of helix, which is about double the length of a loose bracelet, which also happens to fit perfectly as a choker. So it can look four different ways, and makes a VERY good fidgety object. (Twist, untwist, double-twist, pluck so it rattles...)
I might put up images of what happens if you twist it further in either direction, but probably won't get around to it. Ah well.
Saturday, September 5, 2009
Notebook: Part II (outside).
For notebook covers, I use suede that has been rescued from thrift stores in the form of torn, grimy, stained, and otherwise worn clothing. This piece of sage-green suede came from a jacket.
I am a bit of a romantic -- just a bit -- and so when I've made notebooks in the past, I drew things on the inside of the cover. It's a place that wouldn't show when the journal was finished, so there was a hidden element that made the process extra interesting. If anyone bought one, I planned to send them a picture of what was inside. This time, however, I was especially pleased with the drawing, and decided to make it the outside instead. So: ZEPPELIN! (Drawn with a lovely Staedtler Lumocolor permanent pen; I forget the size.)
 The corners are cut off so that, when folded over, they will fit together and not have to be folded or overlapped (a problem with suede, since it's thick, as cover materials go).
The next item of business is gluing the cover together. I used plain chipboard for this one, though I go for heavier (but NOT corrugated) cardboard when I can get it. The pieces should be a bit larger than the pages, such that the cover will stick out further and protect the paper. I don't put any glue on the other side of the boards, mainly as a holdover from not wanting to wreck the drawing behind, but it's also not necessary and gives you more leeway.

Letting the glue dry a bit, until it gets tacky, is a good thing to do before you fold the edges over. You don't have to hold it in place as long, and it's easier to position things how you want them, though there's still flexibility.

Next, one must glue one side of the endpapers (two pieces of fabric, cut the same size as the pages) to the outside of the block of paper. Try and get the glue as even as possible, not using too much, and press well and long before the next step: gluing the other side to the inside of the cover.
I use piece of contrasting suede as a bookmark. Cut it about 1 1/2 times as long as the book, and glue it to the back cover before attaching the endpapers. Having it on the back cover, rather than the spine, makes it lay flat with the pages -- instead of forcing the paper apart.
 Again, let the glue dry slightly before pressing things together. Do your best to leave the book alone while pressing it under a weight... I'm planning to make an actual press soon, with rigid boards and wingnuts, but until then I must trust myself not to lift the books off and admire the journal too much while it's drying.
Final step: Photographs!!!


There you have it: a lovely journal that you are not afraid to "waste", because you can make another in a few hours.
Commissions! Resources!
Well, it looks like I might be able to make this work. New things, exciting for creative folk in the Ann Arbor area:
• Makerspaces! Bilal -- a guy whom I met during my unproductive (but fun) time on the Gargoyle magazine staff -- invited a bunch of people, including me, to a meeting a few Fridays back. It's basically a group where you come and make things, talk with other innovative types, share resources, et cetera. Sarms, another cool dude, gave me a tip about free mass paper cutting, so that's sped up my process with the journals. It is most excellent.
• Mini Maker Faire! I met a lot of most excellent people through the first Ann Arbor Mini Maker Faire. This took place last weekend, and I exhibited under the project name "Second Skins (Reworking Leather)", in conjunction with the A2 Hands-On Museum. Basically, they provided materials, and I gave out their fliers. I got kind of swarmed by little ones who wanted to make books and pouches -- sometimes the parents made more than the kids -- but I took away some great experience, for possible future shows, and met lots of awesome co-fabricators. Bob Stack also gave me (free!) a bunch of scrap copper from his gorgeous die-cut butterflies, which he was making for Faire-goers.
And COMMISSIONS! I have officially been commissioned -- twice! -- to make things for people. My camera's freaking out, or I'd have some pictures to back up my talk. The first one was a helix-weave (more on that later) necklace for my housemate John, to keep his keys on. The second, still in progress, is a journal... a SECRET journal, as yet, for certain reasons.
I need to finish the "making journals" thread. There have been exciting recent developments, involving me, a Staedtler Lumocolor pen, and truly hazardous concentrations of glee. (Also zeppelins.)
Subscribe to:
Comments (Atom)
