Friday, December 4, 2009

More near-IR pictures

Edit: many more photos on Facebook. :D

Playing around with the webcam again. It's a GE EasyCam, which was quite easy to customize: the head assembly has two halves that snap apart easily after a screw is removed, and then the whole lens part screws off and that part has the IR filter in back. Pry it out with a needle and cut a couple of tiny squares of black film negative, put them in place (mine fit perfectly under the tabs, w00t), reassemble, done. I realized during the process that you don't even have to remove the stand.

So here's what I've got this afternoon, while the clouds are clearing up but the sun is setting. First, my black sleeves show up lighter than my powder-blue T-shirt:


Lighter even than my (Polish/Viking) skin:


Also, the near-IR spectrum does freaky things to eyes (not just an anomaly in this picture):

(A goth kid's dream.)

The dark, yellowish-green bushes outside contrast with the more bluish-green fir tree:

And another for extra credit.


:)

Saturday, November 28, 2009

Infrared fun

So we were messing about on YouTube, and David found a video about making an IR filter for a digital camera. We determined to attempt this tonight, and I'm quite pleased with my efforts. I used an aggregate process culled from various online tutorials, so the project is by no means original. But it is very fun!

I took a few pictures of the process, but really it's no different than anything else you can find out there. I'm just happy about the output I've got so far, which is up on Posterous... nice video of the mini-blowtorch and a hot needle. Huzzah!

Tuesday, November 24, 2009

Oh. Yes. That.

What? Hmm? You've noticed my flash drive looks a little strange?

Rather like a ray gun, perhaps?

Perhaps.

I'd toyed with the idea of making some steampunk goggles, but for several reasons dragged my feet. A, they're overdone, B, I don't do plastic but hunks of metal + face = cumbersome, and C, I couldn't immediately come up with a solution for the lenses. (Again, I don't do plastic.) But I wanted another project. And then one night I was sitting around, and I realized what I must do with those clock gears I've had laying around my bedroom.

It's time to build a ray gun.

This will be a secondary blaster, mounted above a larger one and set back a little. I'm currently thinking of making TWO guns, because I have too much excellent stuff to fit on one. I have:
• Clock gears/sprockets
• Burgundy and black suede for the grips (only one grip color for each gun)
• A small purple glass flute vase for a barrel (with ray-shooter mounted inside)
• A double-lensed jeweler's loupe
• Two frightening-looking needles (I think they're for injecting marinade into meat... but for me they shall be ray-focusers):

• Ring of ball bearings, clock part for crosshair, random bit of copper, clock part for trigger:

• 5-gigabyte Rio Carbon that largely died a few years back, but still functions well enough to work as a storage drive:
I'm particularly excited about this last element. I reshaped the metal backplate to fit more snugly around the thing's guts, and it will be the crowning bit of geekery inside. I've also changed the settings to keep the backlight on, which will give me some red LEDs to display. I also have a ring of 9 white LEDs, which are lovely and bright, so I can even have it be a flashlight as well. Bwaha. Bwahahaha. Bwa... ha.

(I am very happy that this has inspired my friend Link to make himself a raygunlight for use at the office. Excellent, excellent.)

In other news, I brought my mandolin up to North Campus and recorded a far more strange version of "I'm Not Sorry" (steampunk/speculative folk song), with layers and layers of mandolin. I'm very happy about this, as it has much better vocals. I still trip up a couple of times, but my voice isn't all over the place. I also got to sing with Jess when she performed at Café Verde last Saturday; we did "Sons and Daughters" by the Decemberists, an excellent song and oh so improvisable.

Good times.

Monday, October 19, 2009

Bleach!

It's been a while since I came across this technique, so I'm not sure where I first heard about it. Anyways, the idea is to take a piece of cloth and paint or spray bleach onto it, to selectively lighten the fabric. This is so fun and simple that I am having a bleach party next weekend; we will throw bleach EVERYWHERE and create MASSIVE DESTRUCTION. (Perhaps I EXAGGERATE slightly.) It will be MARVELOUS!

I have lots of somewhat-ill-fitting solid-color tank tops from thrift shops, so it was easy to pick out some fabric to play with. Natural fibers, of course, work best as they will absorb the bleach. However, the bleach will weaken it, so go easy. I diluted the bleach a little, so I'd have more time to draw before I rinsed and the designs wouldn't appear gradiented. A while back David and I liberated some sheets of plastic from the Art Museum dumpster, and those make excellent mounts: they provide a stable surface and prevent the bleach from leaching through to the other side.

I set up some newspapers and one tub of bleach, one of water. I needed way less bleach -- you really don't use much at all -- though most of that is water, later cast out because I wanted the solution more concentrated. I didn't end up using the gloves either; I did 5 shirts, and my hands are fine. Those brushes have nylon bristles, which held up fine to the bleach, and they will be dedicated for this specific use.

Shirt on long plastic board, which I could rest on my legs and lean against the table as a sort of easel. This was my experimental shirt: I was still getting the concentration right, so there's kind of a crappy drawing of birds and dinosaurs on it now. My drawing technique also improved dramatically over the hour or so it took to do five of these.

Some crappy nature tableau.

Attempt to recreate the Reclamation logo from Templar, AZ (plus identifiers for Soviet 12). All-cotton shirt; brown dye -> pink. Meh.

About 5% cotton tank: took several applications, but that looks kind of cool anyway.

Mandelbrot set tank. 95% cotton, black dye -> pinkish orange. Came out quite nicely, and got a lot of comments. Etsy?

Balloons! Balloons balloons balloons. There's a UFO on the shoulder. All cotton; very fast color change. Kind of pinkish.

A reference to the excellent VURT, by Jeff Noon. Greenish fabric -> yellow.

After painting each shirt, I ran it under a stream of warm water, which worked fine to get the bleach out. At the end, I ran everything through the washer with no detergent (I'm not sure this matters) and the dryer. The lighting was poor by that time, and so result pics will have to wait until this afternoon.

Some observations:
• Colors: Brown dyes and some blacks tend to go pinkish, while greens come out more yellow. Fabric with a low natural fiber content will come out with a fainter design, but it will match the overall color fairly closely. A black 5% cotton shirt bleached to a subtle medium grey, though it took a few applications for the design to really show up.
• Brushes: Small tips offer great control, but they also hold less bleach, which means less of a feathering problem. Bleach mostly stays where it's put. I've heard of using spray bottles, which might be fun to try, but I don't have the patience/control to cut out stencils.
• Fabric: Ribbed material will leave dark lines in the design, unless you want to bleach the hell out of the fabric. So it goes.

Thursday, October 15, 2009

Tea and a blowtorch

Note: Blogger is being a jerkface, so I've put metal-patina photos up on Posterous.

Last week was a good friend's birthday, and I wished to make her something... however, the risk is always making it more of a "you are cool and deserve something unique" thing, rather than "oh look, see what I made". My current solution is to take something I already know they like and tweak it a little. In this case, she's been into rooibos lately, and the local PFC has many excellent tea ingredients in stock (for cheap!). Thus: Rooibos Dream Tea!

Rooibos has a kind of gentle, nutty flavor that is best accentuated with something that cuts the softness; in the past, I've used lemon juice, but I'd rather blend dry flavors. I bought some ingredients that sounded like they'd go well with it: rosehips, hawthorn berries, licorice root, and hibiscsus flowers. It all came to about $5. I first tried hibiscus in tea after having a dream where some friends and I were eating hibiscus flowers, dancing on the moonlit shores of a stream that was lighted from below. Hence, dream tea. The hibiscus imparts a gorgeous, deep red color and delightful tartness to tea, but too much of it is harsh (many commercial teas get this part wrong). Licorice has a strange sweetening effect that comes on as you swallow the infusion, which I find pleasant mostly as a mixer; it doesn't taste like licorice candy. I didn't know beforehand what the rosehips and hawthorn berries would do.

Brewing a little of each ingredient in its own cup, I sampled them along with a mug of the rooibos. The hawthorn berries were disappointing; they imparted almost no flavor (or color). The rosehip brew also didn't taste like much. The licorice was potent and too intense in proportion to the water, and the hibiscus was perfect. I poured some of these last two into the mug of rooibos until I had something delicious, then blended approximately proportionate amounts of raw ingredients, et voilà. A blend to warm the autumn.

•••

Of course, cold weather also calls for fire. Last Christmas, I came into possession of a butane-powered cordless soldering iron, and since then I've been searching for fuel for it (it came empty). A recent flash of inspiration led me to the local smoke shop (Smoka Hookah), and I spent the afternoon experimenting!

Apparently, since high school FIRST Robotics, I've lost any soldering ability I had. I improved after a couple of tries, but got bored of waiting for the tip on the iron to heat up and cool down. So I took the tip off and took the mini-blowtorch to some scrap copper wire, putting a patina of color on its surface. I'm going to experiment with finishes and see if I can seal the color in. I had an issue with thicker copper losing its color as it cooled down, which seems to not happen if I quench it in water once I've got a pattern I like.

•••

Finally, I have long sought an online source for free classical sheet music, and now my friend Murphy has introduced me to Musopen! They also have lots of recorded public-domain music for download. <3

Saturday, September 26, 2009

Musics

So...
Steeleye Span.
Marvelous British folk-rock group, to which my sibling Andy introduced me rather a few years back. A couple of months ago, I saw they were coming to the Ark, and decided that this was necessary. The concert was on Wednesday, and it was all that I could have hoped for. They played a lot of new stuff, and then their first encore song was my first Steeleye experience, "All Around My Hat". Sing-along-age was had. And then they played "Hard Times of Old England". And all was right. Also, David and I got a free copy of their "Bloody Men" CD!

This ties in with my recent joy: writing steampunk folk songs. I'm not sure where the idea came from, but I certainly haven't seen anyone else doing them. Anyway, these are the first songs I've ever written that sounded decent, and the excellent Jess and I recorded some today in the studio up on North Campus. The time constraint means I can't scrap 12 takes running -- good for my sanity, not so great for quality (the vocals are rather dodgy) -- but eh. Free studio space! :)
I have two done, and they are called "I'm Not Sorry" and "Firefly Waltz". One is about zeppelins and betrayal. The other is about betrayal and robots. I do want to do cleaner versions, and hope to add some mandolin soon; I just haven't got a mando part worked out yet. Plus, that requires either multiple sessions or bringing both guitar and mandolin up on the bus. Bleh.

So, yes... forays into musicality. Besides the hour spent fixing machinery, and the lack of water, most excellent. And I am going to branch out genre-wise. It is exciting.

Monday, September 21, 2009

Magnetic fingers!

It sounds pretty awesome to have a sixth sense, for electromagnetism (à la this Wired article on rare-earth magnetic implants). But I'm not so keen on the surgery, stuff breaking down inside me, and possible infection aspects of the process. Plus, the "non-removable" part seems a tad impractical. And then, last night, David (my most marvelous S.O.) reminded me that he'd once brought me some broken neodymium ring magnets.

...Experiment time!

I happen to have a decent collection of different types of wire, for 2D twisted-wire drawings (I got into this when making things for a holography project) and jewelry-grade maille rings. During a couple of short house meetings, I came up with three of these:


Each is made from a single piece of brass wire and a magnet (I think the brass/nickel combo gives it a touch of steampunk aesthetic). They're probably not quite as sensitive as the implants, as they're not right against the skin, but they certainly work. The magnets are very strong, and I'll definitely keep playing with this concept. More pictures to come, including detail shots of all three, plus whatever else I come up with.

Thoughts and observations:
• It works best when the magnet is loose in its holder (though still secured against possible escape). This allows it to oscillate freely, which I can feel via the wires.
• Smaller pieces seem to work better, probably for the same reason - free oscillation within a cage-style attachment, while larger pieces suggest a wrapped fixture, as above. Due to these factors, plus the fact that many feedback wires attach magnet to finger, the first fingertip I made (left in the picture) is the most sensitive.
• I'm going to try making earrings, though these will probably be ear cuffs in the same wire-wrapped style, rather than with magnets sandwiching the ear. I do not wish to have my flesh squeezed. But I have a tendency to lose ear cuffs (part of why I make, rather than buy, them), so I'd have to make these extra-secure.
• I am a total sucker for jewelry that does stuff. These are a bit impractical for everyday wear, but the cuffs will definitely be making an appearance. :)

Tuesday, September 15, 2009

Helix chain!

Let me introduce you to my favorite chain weave. Why my favorite? Because it's the first one I've "made up", without referring to any guides. I was looking for a way to make an extra-strong chain, and came up with hooking each link through the previous two. Thus, I don't know if it is widely known, has a name, or if anybody actually uses it -- especially it has a property that might make it undesirable, but for me, adds to its charms. It is unstable; or rather, it morphs.

The first thing to do is get yourself a pair of pliers, preferably the type that has a compression spring to keep it open when you're not squeezing the handles. I've just been using a pair of multitools (a Leatherman and a random one I got from my sibling). Then you need rings, which you can either make (a topic for later!) or buy. I got these from The Ring Lord (0.4 lbs of Bright Aluminum rings for about $17)... I will definitely buy in bulk in future -- about $10.50 of that was shipping -- but I didn't know if I was going to be sticking with this hobby.

The rings come like this, not open but not closed either. Our first order of business is to open lots of them, wide enough that you can pass another ring through the opening. Open them to the side, twisting, not pulling.

Now we can begin. Close one ring all the way and hook an open one onto it, then close.

Hold these two together so that they lie semi-flat against each other. Then hook another open ring through them both at once. Continue to hold the last few rings flat(-tishly) together while hooking new rings in; this will keep your spiral going in the same direction. Otherwise, it will not produce the helix.

Yes my fingernails are dirty.

Shut up.

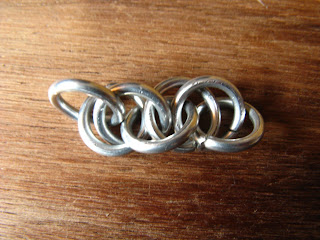
At the start, it may appear that you're doing everything wrong, because if you set the chain down it looks like this: messy and disordered. Don't worry; it always does.

But once you get a decent few rings together, it starts to look like something you'd like to attach to yourself.

I usually just fabricate a clasp from some scrap copper or brass wire, but this guy wanted it to just go over his head, so I attached the ends together such that it stays in "helix" configuration (twist and attach with a couple more rings) and added a little tail of chain to which he could attach his keys. I didn't really get a good picture, though, so this is what you get.


So, why do I like it so much? Well, you twist it one way, and it does this:

And then you twist the other way, and it does this:

. . . which I think also looks pretty cool. In this form, it looks like what it is: two chains interlocked. Each link is also pretty loose this way, so you can make it make noise. :)
These two pictures are actually of my first piece of helix, which is about double the length of a loose bracelet, which also happens to fit perfectly as a choker. So it can look four different ways, and makes a VERY good fidgety object. (Twist, untwist, double-twist, pluck so it rattles...)

I might put up images of what happens if you twist it further in either direction, but probably won't get around to it. Ah well.

Saturday, September 5, 2009

Notebook: Part II (outside).

For notebook covers, I use suede that has been rescued from thrift stores in the form of torn, grimy, stained, and otherwise worn clothing. This piece of sage-green suede came from a jacket.

I am a bit of a romantic -- just a bit -- and so when I've made notebooks in the past, I drew things on the inside of the cover. It's a place that wouldn't show when the journal was finished, so there was a hidden element that made the process extra interesting. If anyone bought one, I planned to send them a picture of what was inside. This time, however, I was especially pleased with the drawing, and decided to make it the outside instead. So: ZEPPELIN! (Drawn with a lovely Staedtler Lumocolor permanent pen; I forget the size.)

The corners are cut off so that, when folded over, they will fit together and not have to be folded or overlapped (a problem with suede, since it's thick, as cover materials go).

The next item of business is gluing the cover together. I used plain chipboard for this one, though I go for heavier (but NOT corrugated) cardboard when I can get it. The pieces should be a bit larger than the pages, such that the cover will stick out further and protect the paper. I don't put any glue on the other side of the boards, mainly as a holdover from not wanting to wreck the drawing behind, but it's also not necessary and gives you more leeway.


Letting the glue dry a bit, until it gets tacky, is a good thing to do before you fold the edges over. You don't have to hold it in place as long, and it's easier to position things how you want them, though there's still flexibility.


Next, one must glue one side of the endpapers (two pieces of fabric, cut the same size as the pages) to the outside of the block of paper. Try and get the glue as even as possible, not using too much, and press well and long before the next step: gluing the other side to the inside of the cover.

I use piece of contrasting suede as a bookmark. Cut it about 1 1/2 times as long as the book, and glue it to the back cover before attaching the endpapers. Having it on the back cover, rather than the spine, makes it lay flat with the pages -- instead of forcing the paper apart.

Again, let the glue dry slightly before pressing things together. Do your best to leave the book alone while pressing it under a weight... I'm planning to make an actual press soon, with rigid boards and wingnuts, but until then I must trust myself not to lift the books off and admire the journal too much while it's drying.

Final step: Photographs!!!


There you have it: a lovely journal that you are not afraid to "waste", because you can make another in a few hours.

Commissions! Resources!

Well, it looks like I might be able to make this work. New things, exciting for creative folk in the Ann Arbor area:
Makerspaces! Bilal -- a guy whom I met during my unproductive (but fun) time on the Gargoyle magazine staff -- invited a bunch of people, including me, to a meeting a few Fridays back. It's basically a group where you come and make things, talk with other innovative types, share resources, et cetera. Sarms, another cool dude, gave me a tip about free mass paper cutting, so that's sped up my process with the journals. It is most excellent.

Mini Maker Faire! I met a lot of most excellent people through the first Ann Arbor Mini Maker Faire. This took place last weekend, and I exhibited under the project name "Second Skins (Reworking Leather)", in conjunction with the A2 Hands-On Museum. Basically, they provided materials, and I gave out their fliers. I got kind of swarmed by little ones who wanted to make books and pouches -- sometimes the parents made more than the kids -- but I took away some great experience, for possible future shows, and met lots of awesome co-fabricators. Bob Stack also gave me (free!) a bunch of scrap copper from his gorgeous die-cut butterflies, which he was making for Faire-goers.

And COMMISSIONS! I have officially been commissioned -- twice! -- to make things for people. My camera's freaking out, or I'd have some pictures to back up my talk. The first one was a helix-weave (more on that later) necklace for my housemate John, to keep his keys on. The second, still in progress, is a journal... a SECRET journal, as yet, for certain reasons.

I need to finish the "making journals" thread. There have been exciting recent developments, involving me, a Staedtler Lumocolor pen, and truly hazardous concentrations of glee. (Also zeppelins.)

Saturday, August 8, 2009

Notebook: Part I (inside).

Pocket Moleskines: 12-dollar nuggets of goodness, perfect for taking on voyages. But I can't afford to feed this habit, and I tend to put off writing in them because they're so nice I don't want to "waste" them. So, last November or so, I checked out Michael Shannon's page on making your own faux-Moleskine notebook, and this art has become something of a (benign) habit. Particularly once I realized that you can use ANY kind of paper. My favorite is graph paper, but you can also use...
Staff paper!
Parchment paper! (faux vellum)

Once you've chosen, you take a sheet of paper and -- well, you know the song... YOUUUU MUST RIP IT!

Into four pieces. You then fold each of these in half, leaving you with folios. (Folia?)

I think I'm going to start using a paper guillotine, because matching these can be a pain. Both of those sheets have the fold on the opposite side (away from us, in the picture), so you have left-fuzzy and right-fuzzy folios.
Now we collate them into signatures. For this weight of paper, I used 8 folios/signature, which makes mini-"books" of 16 pages. Just stick one folio inside another, and if you have fuzzy edges, it works best to alternate "left" and "right" folios.

Once you've made 6 signatures, you can put them together into a block. As you can see, that wavy edge-pattern you've seen on some old books is due to the folios being collated after the paper was cut.

Lovely, no?


...Of course, you can't make these stay together until you've punched holes through them, which was the secret catch to this post. Oh man, you'll have to take another ten minutes now. I win!!

Sew anyway...
Then you sew them together. On this one, I forgot that one is meant to punch four holes, rather than three, but it still worked... just won't be as even.


So now you've got your signatures all sewn; you do still need to smear glue on and near the spine, then press cheesecloth (or gauze, like I use) into the glue, to hold everything together nice and firmly. Leave this assembly pressed between a rock and a hard place, and move on to the cover.

And once you have that, it is time to take over the world. And/or make some endpapers. And find something to cover it with. Part II to come soon!

P.S. I made more tarts this morning. <3

Sunday, July 26, 2009

Apricot-peach tarts

Having lived in England until I was seven, I treasure memories of toad in the hole, bangers'n'mash, lemon curd, clotted cream, sherbert fountains, liquorice allsorts, Cadbury Flakes, mince tarts, lemon tarts, strawberry tarts, and so on. Fast-forward to the present day, and you have a 22-year-old who, at the slightest wink of opportunity, puts everything and anything into a crisp, flaky shell of golden pastry. Into TARTS.

A recent dumpster-diving success left us with some perfectly ripe, somewhat squashed peaches and apricots. While we gorged ourselves on the accompanying melon, strawberries, cherry tomatoes, 50+ pounds of bread, etc., I sought to preserve some of the lovely, sun-colored stone fruit by roughly chopping the flesh and freezing it in cubes (with the juice and a little bit of water). Having rediscovered some of these cubes, I made some sweet nuggets of delectableness. TARTS!

I use the Joy of Cooking vegetable oil crust recipe, but since these are tart-sweet, I left out the salt. The fruit still has a biting quality, which melded perfectly with the neutrally crisp crusts. The recipe is incredibly simple; for 12 tarts:
• preheat oven to 425º F.
• mix 1/3 cup plus 1 T vegetable oil and 1/4 cup cold soymilk (vanilla would probably be nice) (until creamy)
• pour this over 1 1/3 cups flour
• stir with fork until blended
Once you have the dough, pull off balls about 1" in diameter, smash them between your palms, and press these into the hollows in a greased muffin pan (only coming about a half to 3/4" up the sides). Bake for 10-12 minutes, until gorgeous.
Heat the cubes in the microwave, smashing occasionally with fork, until quite warm. Spoon into the baked crusts. Absorb.

Best flavors so far:
• Apricot-peach
• Orange with dandelion jelly (amazing)
• Fresh strawberry-raspberry-blueberry
• Fresh cherry with strawberry sauce
• Dandelion jelly with huckleberries
• Dandelion jelly with heirloom tomato (so good)


Lust!!!

Tuesday, July 14, 2009

cheerful

My job, political canvassing door-to-door, is not particularly fulfilling, though it is outside and pays well. That and sad music videos make me need a bit of a jump-start. So:
Muppet Danny Boy
Swedish Chef making banana split
Muppet dancer
Father Ted - My Lovely Horse
Father Ted - Spiderbaby
Introduction to Maru the cat
William Shatner "sings" Common People
Men at Work - Land Down Under

Have a good day. :)

Fridge tea

Is spectacular. Inspired by accounts (such as a recent story on NPR's The Splendid Table) of sun-tea alternatives, I made my own. It is perfect for Michigan summer, when the temperature is satanic and you can pick a handful of fresh mulberries to go with it; this method makes tea without bitterness. Take a teabag and drop it in a bottle of water, stick it in the fridge for a few hours or overnight, and you have a bottle of amazing. I've been experimenting with flavors, thanks to the local People's Food Co-op and By the Pound bulk foods store, which both carry ingredients as well as tea blends for cheap. I could use a tea ball, but I was given some marvelous fillable tea bags, and they do admirably.

Good flavors so far:
• Earl Grey
• Raspberry
• Rooibos with lemon
• Lemon-ginger-licorice
• Lipton "red tea" (rooibos with strawberry and things)

Magic ingredient for black teas: sweetened condensed milk.

Sunday, June 21, 2009

wood carving

A few years ago, I believe when I was still very into the Lord of the Rings, I told my grandpa that I wanted to carve wood. He responded with approval and gave me the whittling set that he had abandoned, and soon after that I also abandoned it. But the soapstone carving has reawakened a jonesin' for such things, so maybe tomorrow I'll put up some pictures (if I get anywhere with it).

I'm looking for a very gentle way to polish the soapstone smooth selectively (to highlight particular elements)... further updates as events warrant...

Tuesday, June 16, 2009

Soapstone carving: "Fly"

As my co-op's maintenance manager, I get to fix things. Like faucets. Which means taking out the truck to Lowe's in search of such things. On this trip, I couldn't find the proper one, but I ended up in the welding section and found this treasure: for $2.31, seven sticks of soapstone, clouded with grey and eminently carve-able, stonework for the tight of budget.

What you need:
• soapstone (used for marking welds, apparently): hardware store
• small, sharp flathead screwdriver: hardware store
• damage-able surface

I had a look at the dark swirls in the stone, with the sun behind it and also by wiping it with a wet cloth, to see what sort of pattern would fit.


I made two pieces: the grey area above became clouds, and the other part got cut (score and snap)...


...and became a feather.


The form starts with a lightly scratched outline, and then I start scraping around it with the flat of the screwdriver head. I slope the scraped part inward, so as to create the illusion of a raised design. Details are added, the grades are run over a few times for smoothness, and we have our design.

Fortunately for me, the pieces of stone are cut somewhat roughly, not polished; in this case, the cross-hatching from the saw became texture detail on the feather. The clouds came out less satisfactorily, but I still like the piece.
The first one got a touch of Russian - "летай", the imperative "fly". The second didn't really need anything more on the front, so the back got "небо": "sky". I may do a couple more and make it a series...

As a final touch, I put my stamp on the side.

Et voilà! Two pendants, perhaps a few dollars, and marvelous occupation for an hour or two as the job search continues.